Showing posts with label BIOS. Show all posts

Saturday, May 31, 2014

Cosmos - Part 2 - Let's make a shell

This advertising slot is open! To have a paragraph here featuring your company (doesn't have to be tech related), go to http://www.fiverr.com/armmaster17/mention-your-company-in-a-blog-post.

Hey blog readers! we have a new Facebook page! Check it out at http://on.fb.me/U9s2Ld

Hello once again blog readers. If you haven't already, go check out part one first before you try any of the examples below. http://allstuffnerdy.blogspot.com/2014/05/cosmos-part-1-programming-your-own-os.html It will save you a lot of headaches. But for everyone else, welcome back! So now we can get started editing code. The first thing you want to do is open up your project from last time. Open Visual Studio and go to File->Recent Projects and Solutions-> and the name of your project. If you installed Visual Studio for the first time in the last post, then it should be the only one that pops up. Once you have that open, it should look like this.
Once your windows looks like this, we can continue on. Just note that the line that says namespace TOS  Should look say namespace and then the name of your project.
The first step is to delete the default code and add some more code. Go ahead and delete the code from your windows so it looks like this:
You will have to type in those two lines with the green text. And once again, line 6 should have the name of your project, not TOS (see, this is why you can't just copy and paste peoples code and expect it to work). But once you have that up, we can get started coding. Here is the completed code. Go ahead and type it in and then I will go through it line by line. I have included a picture of the code because practice makes perfect. Typing the code will help you learn it faster. And it lets you see how it should look on your screen (if something is a different color, you probably did something wrong).
If you go ahead and run (click the green arrow), you will see  it run where it will ask you for your name, and then show a prompt (#). Go ahead and type in "echo" without the quotes and press enter. You should see "echo echo echo...". When you see the "#" again, go ahead and type in something random and press enter. You should see "ERROR: unknown command". Now let's go ahead and review the code so you can see what it actually does in the program.

Lines 1-9 do nothing important at the moment. But without them, your code wouldn't run. Lines 10-18 is the BeforeRun() method. This is what Cosmos calls as soon as it loads. BeforeRun() just runs once, so this is where you usually put loading commands and things like that. On line 12, you see Console.WriteLine("Loading...");. Anytime you see Console.WriteLine("Some Text Here");, you are telling the computer to write "Some Text Here" to the screen. The next line (line 13) is what's called a comment. This line is ignored by the compiler and is just for you. It's just a note so you remember what your code does in that spot or what you need to add in that spot. Honestly you could have just skipped that line and it would have not made a difference in your program, but it is a very good habit to comment your code. Moving on to line 16, we see some new code. The first part is "String name". This is called a variable. It stores a value for us. String means that we want to store some text. There are other types of variables including Int (numbers), bool (true/false), and a lot more. But we will get to those in a later segment. The next part is the "=" sign. We are telling the computer that we want to assign the variable "name" the value on the other side of the "=" sign. That value that we want is Console.ReadLine();. Opposite from Console.WriteLine(), Console.ReadLine() lets the user type in a line of text and it will return it when the user presses enter. So in English, we are saying: Ask the user for a line of text. And when I ask for "name", tell me what the user just said. It may seem a little bit complicated, bit it will start to make sense over time.

Moving on to lines 20-31, we see the method Run(). Cosmos will loop this until your program quits (you shutting down VMware Player). So there is nothing new on lines 22 through 23, but 24 is definitely new. This is called an "if" statement. We are saying "if this is true, do everything inside of the brackets below". In this case, we are saying if the variable cmd equals "echo", then run Console.WriteLine("echo echo echo...");. Beneath it we have line 28. This is called an else statement. This only works if you put it directly beneath an "if" or an "else if" statement. This is saying "if the above if statement if false, do this". In this case, if cmd does NOT equal "echo", do Console.WriteLine("ERROR: unknown command");.

Well congratulations! You have created an interactive shell! In the next part, we can start working with some graphics. We can start with a mouse and work our way towards making a crude GUI (don't worry if you don't know what this means). If you ran into any trouble, feel free to leave a comment below and any of the authors will help you out. Remember that you don't need a google account to comment, just select "Anonymous". Just be warned that you will not receive emails when someone leaves an answer to your question. If you see any errors or improvements, feel free to notify us in the comments and we will make the appropriate changes. When you are ready, go to part 3 here -> http://allstuffnerdy.blogspot.com/2014/06/cosmos-part-3-mouse-support.html. Have Fun!

Hey blog readers! If you want to follow our meaningless updates, check out our pages here:
Facebook: http://on.fb.me/U9s2Ld
Twitter: Follow us @allstuffnerdy
Google+: https://www.google.com/+AllstuffnerdyBlogspot
If you have a business you would like us to mention at the beginning of a post, check out our gigs on Fiverr:
Joshua: http://fiverr.com/armmaster17
Brandon: http://fiverr.com/maltzy

Friday, May 30, 2014

Cosmos - Part 1 - Programming your own OS in less than 5 minutes

This advertising slot is open! To have a paragraph here featuring your company (doesn't have to be tech related), go to http://www.fiverr.com/armmaster17/mention-your-company-in-a-blog-post.

Hey blog readers! we have a new Facebook page! Check it out at http://on.fb.me/U9s2Ld

Have you ever wanted to program your own operating system. If you have ever talked to someone who has done this before, they probably tried to scare you away with "bootstraps" and "GDT tables" and so on. Well, there is an easier solution, and you can make your own operating system in less that 10 minutes with NO programming experience. Welcome to Cosmos.

Prerequisites:
-Basic programming knowledge (C# is recommended, but Java, C++, VB.NET, FORTRAN, or Delphi should be fine)
-Patience
-some more patience
-about an hour (or a weekend, whatever you think you'll need)
-VMware Player (if you know what you are doing, you can skip this and use your own Virtual Machine)
 You can get VMware Player for free at https://my.vmware.com/web/vmware/free#desktop_end_user_computing/vmware_player/6_0
-A copy of Visual Studio (instructions below)

To obtain a copy of Visual Studio that works with Cosmos, first you need to know what you are looking for. You are looking for one of the following versions of Visual Studio.
-Visual Studio 2013 Express
-Visual Studio 2013 Professional
-Visual Studio 2013 Ultimate
-Any other version of Visual Studio 2013 (except for Beta, Team Explorer, and Shell editions)

If you don't already own any of these, I recommend Visual Studio 2013 Express, it's the only free one. I will be uploading screenshots from Visual Studio 2013 Professional. There should be no difference other than you might see a few extra buttons on my screen (which aren't required to make Cosmos work).
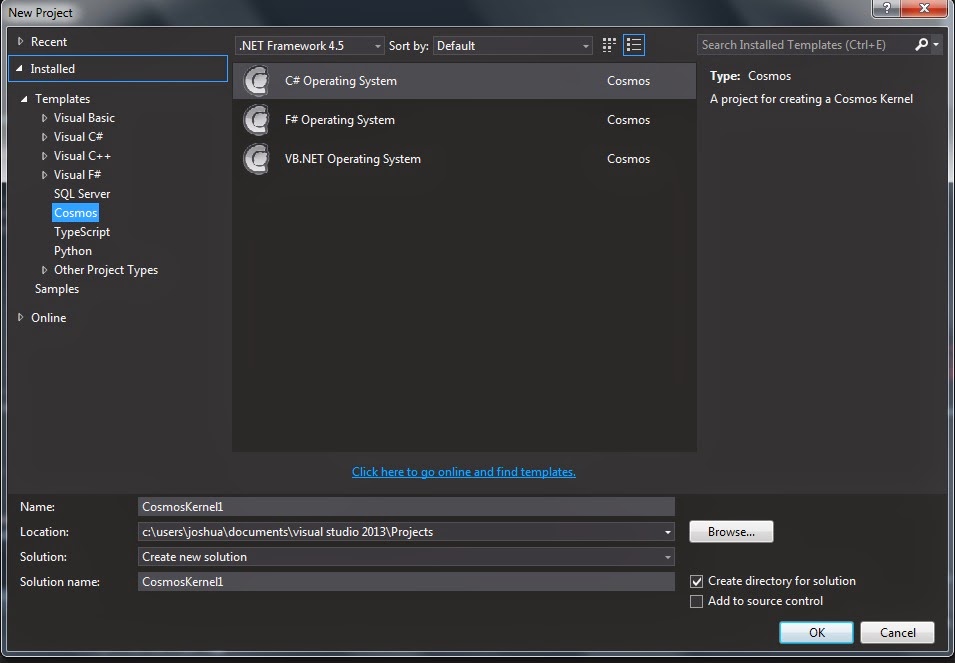
This is what your add project dialog should look like.
Ok, enough of that. let's get started! First head over to http://cosmos.codeplex.com/ and click on the big purple download button. Before you proceed, make sure you have installed Visual Studio and have run it at least once). After it finishes downloading, run it. Make sure you are on an administrative account or it won't work. If it gets stuck around the 100% mark, don't worry. This is normal. Once it finishes, open up Visual Studio and click File->New->Project. On the left hand side, look for an item that says Cosmos. Click on it then look at the big window with the icons. Click the one that has C# in it (make sure it is the C# one, or else you're going to have a bad day). Name it and select a folder to save it to (make sure it gets its own folder, there are a lot files in there that we are going to need). Now we can get coding!
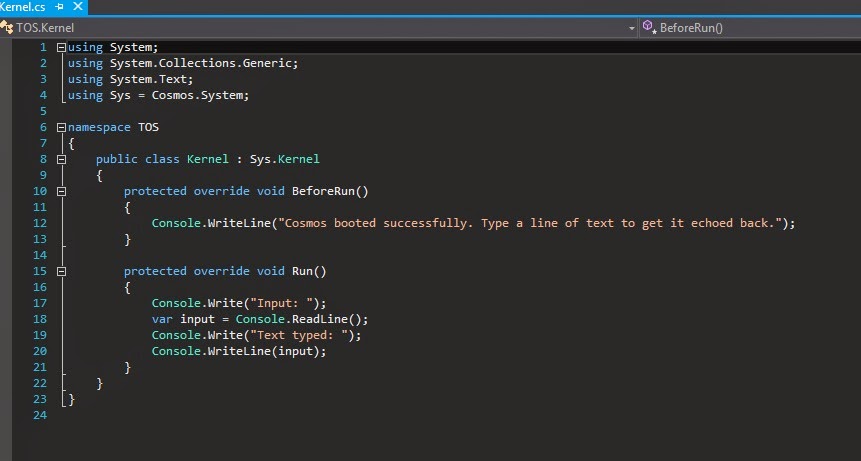
The default code that loads with the template
Once your project loads, you will see some code. To the average programmer, this code is nothing new. To someone who has never typed a line of code, this could look pretty frightening. DON'T PANIC! If you get really lost (or lazy), you can just delete all of that code and copy and paste the finished code at the bottom.
But before we start changing the code, let's just run the default code and see what it does. If you look at the toolbars at the top of the screen, you should see a green arrow.
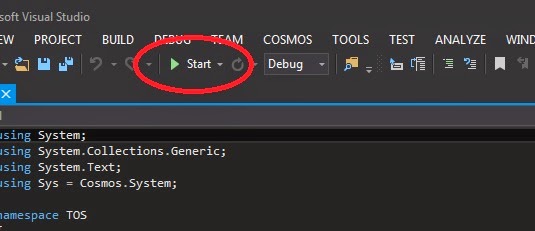
Next to it should be some text (Launch, Debug or Start are the most common, it depends on which version of Visual Studio you are running). Click the green arrow. It can take some time to compile (on my six year old machine, it takes about one or two minutes). Once done, you should see VMware Player pop up. If you see VMware, skip the next paragraph.

If not and you got an error, it could be one of two things. One, you edited the code. To fix this, go back and create a new project. Or two, you decided to not install VMware and use your own Virtual Machine or even use your own machine. In this case, navigate to your project directory and look around for a .ISO file. You can plug this into your own Virtual Machine or burn it to a CD or USB drive and try it on a real machine. You could also try to network boot it, but you will need your own tools (the integrated PXE server has been removed from Cosmos).

Now you should see a bunch of text followed by:
Cosmos booted successfully. Type a line of text to get it echoed back.
Congratulations! You have created your first operating system! Stay tuned for my next article where we will jump strait in and add mouse support with only a few lines of code! If you run into any trouble, leave a comment and any one of our authors will help you. Go to part two here -> http://allstuffnerdy.blogspot.com/2014/05/cosmos-part-2-lets-make-shell.html. If you are more experienced at programming, head over here http://www.codeproject.com/Articles/99928/Develop-Your-Own-Operating-System-in-C-or-VB-NET. They cover everything that I covered in this article, but they also go over the advanced debugging features in Cosmos that you may find handy to use at one point or another. Have Fun!

Hey blog readers! If you want to follow our meaningless updates, check out our pages here:
Facebook: http://on.fb.me/U9s2Ld
Twitter: Follow us @allstuffnerdy
Google+: https://www.google.com/+AllstuffnerdyBlogspot
If you have a business you would like us to mention at the beginning of a post, check out our gigs on Fiverr:
Joshua: http://fiverr.com/armmaster17
Brandon: http://fiverr.com/maltzy

Tuesday, April 30, 2013

Update... (Because I'm that much of a procrastinator)

Hello blog readers!
I'm sorry to tell you that I won't be able to post for a while. Finals in school are coming up and the stuff I was going to review today got lost in the mail (USPS). So, sorry about all this. I am in the middle of a video but my computer is having BIOS issues.
Have Fun!